When you click on links to various merchants on this site and make a purchase, this can result in this site earning a commission. Affiliate programs and affiliations include, but are not limited to, the eBay Partner Network.
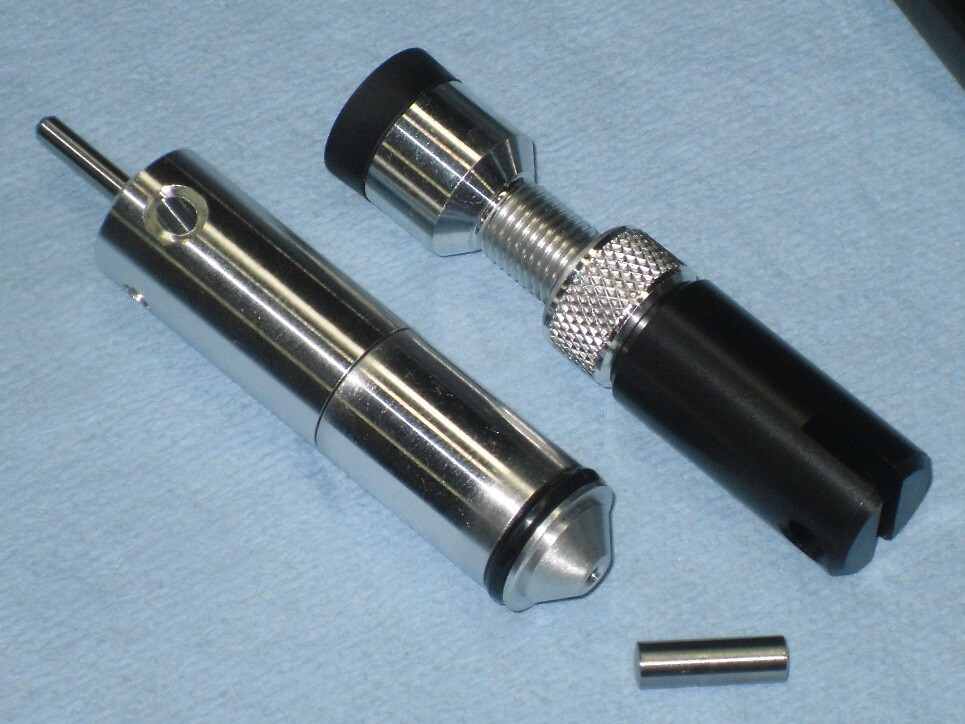
This listing complies with \'s air gun guidelines found here and I will only sell and ship air guns to buyers in jurisdictions where permitted by applicable laws - The valve is not a modified Crosman valve, it\'s re-designed for maximum power and consistency and machined from 7075-T6 aluminum bar stock. We are the only company in the world producing a completely custom re-engineered valve for the 13XX variants.
INSTALLATION INSTRUCTIONS ARE POSTED FURTHER DOWN THIS PAGE, PLEASE READ THEM AS A GUIDE TO INSTALL AND ADJUST THESE PARTS
The valve-halves can be rotated to either side to align perfectly with the port and mounting-screw holes in the pump-tube, which are often not square with each other straight from the factory. The factory valve and custom valves sold by others aren\'t designed to allow this because all of them are factory valves, modifications or not.
The valve body has a larger ID, the cap is larger ID with shorter threads and a deeper chamber, the valve-stem seat is further back which allows the pin on the valve-stem to stick out a little further so it has a longer throw. The combination of all these enhancements means it can hold more air than any other 13XX custom valve on the market. Due to the pin on the stem sticking out a little further, and the short angled port, it empties faster and more completely with less hammer force. The exhaust port is radically angled to produce more power. Because it\'s angled, the opening is oval rather than round, this is not by mistake, it\'s supposed to be this way. The transfer port gasket fits and seals effectively with ports up to about .156\" ID, do not enlarge the port, it will not seal with the gasket correctly if you do and the valve will produce less FPS. The custom piston pin is machined from tool steel with radiused ends to match the internal tube contour, this reduces scoring and makes pumping smoother. The piston head and locking collar is machined from 7075-T6 aluminum, one of the strongest of all commercial aluminum alloys, stronger than many types of mild steel and stainless steels only much lighter. The piston-base is machined from Delrin for ultra-smooth function and to act as a compression-buffer to help protect metal parts from excessive stress. The piston rides on the Delrin base and cup-seal with no metal-to-metal contact to reduce scoring, wear and work smoothly. The cup-seal produces a shot to shot consistency generally within 4-5 FPS which greatly enhances accuracy, almost as good as our flat-faced kit, but with much less maintenance, especially in dusty or dirty environments.
These parts work well at 4-17 pumps. Other sellers advertise kits that allow you to put 30-40 pumps into their valves, this is due to their valves needing 30-40 pumps to equal the power of our custom valves at 15-17 pumps. INSTALLATION :
For the newer Chinese-made 13XX models, the valve now has a groove instead of a threaded hole. You need to drill or ream the hole in the tube larger so the screw threads into the valve only, and passes through the hole in the tube like it does on the US models.
Once the mounting-screw hole in the tube is enlarged, or if you have a US model which doesn\'t need to be, the next step is to deburr the pivot-pin holes inside the front of the tube. This can be done with a small round hobby file or a 2\" x 2\" piece of 300-400 grit sandpaper rolled tightly into a tube to use as a file. Insert the file through the outside of the hole at an angle and file lightly around the inside edge until it is dull all the way around, do this to both holes, then sand the inside surface around the holes reaching in from the front of the tube to make sure everything is smooth. Do not remove a lot of metal, just enough to dull the sharp edge and smooth the internal area around the holes. Oil the outside of the valve, piston and seals before installing. You will need a wooden dowel to install the valve without damaging it or the tube. 1/2\" Diameter by 12\" or longer works well, hardwood is better but softwood will work also. make sure the valve and external o-ring is coated with oil, as well as a little around the inside of the first inch or two of the tube. You can twist the valve side to side a little while pushing it into the tube, this helps get the o-ring past the pivot-pin holes without cutting it. The safer method is to push the o-ring under the edges of the holes in the tube as you slide the valve in, this can be done with a tiny slotted screwdriver or the dull edge of a pick.
The valve seals internally with an o-ring. The two halves should not be twisted tight together, there should be a slight gap between them. This allows the position of the port to be adjusted to either side to align with the hole in the tube. 13XX tubes have those holes slightly out of alignment, some more than others. Being able to adjust the port position by twisting it to one side or the other is necessary for correct alignment. Once the valve is in position, put the trigger frame in place and install the front frame screw lightly, this holds the valve cap in place while you adjust the port. Use a pin-punch, hobby paintbrush handle or similar object to gently turn the port until it\'s centered. Placing the gasket on top of the valve helps to check if it\'s centered. Once centered, push the valve in tight with the wooden dowel to make sure it\'s seated snugly against the stop in the tube, then remove the dowel and tighten the frame screw firmly.
The piston needs to be adjusted correctly to work well and avoid damaging the gun. On the first pump (no pressure in the tube or valve) the forearm should close with moderate resistance, not need to be forced. Once it\'s adjusted to close without forcing it, fire the air out of the valve and without opening the forearm all the way check how much clamping force it has with no pressure in the tube. The piston should compress against the valve face with light to moderate clamping force to hold the forearm up snugly. After making an adjustment, fire the air out of the valve before checking it again. With a flat-face piston you can leave the o-rings off to adjust the length, this allows you to feel how much tension there is without pressure in the tube. With a cup-seal piston, before the gun is fully assembled, you can use the wooden dowel to tap the valve-stem open and fire the valve, so you can feel the fit and function of the piston without pressure in the valve. if the gun is fully assembled, you can fire it after closing the pump forearm to test the piston adjustment with no pressure in the valve. Always make sure the valve port, or barrel if the gun is assembled, is pointed in a safe direction before firing the valve, the air pressure is strong enough to cause injury.
If your tube is bent, dented from hard pumping or is a US model with deep stamped lettering, the valve may fit too tight. We tested dozens of new and used tubes to make sure the valves fit correctly in most cases. If the valve fits too tight to go in without forcing it, use a different tube or fix the issue as explained in the next paragraph.
HOW TO FIT A TIGHT TUBE: 13XX Valves sometimes fit a little too tight in the tube, this is caused by the tube being slightly bent, not perfectly round, or from the stamped lettering dimples on the inside of the tube being too deep. Some tubes have deeper stamping than others so some are a tighter fit. Use a 2\" wide strip of wet/dry sandpaper in the 300-400 grit range wrapped around the 1/2\" wooden dowel, attach the strip to the dowel with a piece of duct tape and wrap it tight. Trim the length of the sandpaper until it fits snug into the tube without forcing it. You\'re basically creating a sanding drum on the end of the dowel. Twist the dowel to get the sandpaper into the tube without it unraveling, twist the drum down into the tight-spots and continue to twist for a couple-dozen rotations. Repeat this process until the valve fits without forcing it. Once the fit gets close to perfect, use oil on the sandpaper to get a smoother finish but don\'t polish the inside of the tube too much, over-polishing will cause the piston seals to bind which makes it harder to pump and can damage the piston seal. We use a custom-made tool attached to a cordless drill to do this, if you have a drill with a 1/2\" chuck, you can use that to turn your honing-dowel which makes the job a lot easier and quicker. Doing it by hand generally only takes a few minutes in most cases, you don\'t usually need to remove much material for the valve to fit. If the tube still fits tight and this process doesn\'t seem to be working within a reasonable amount of time, your tube may be too far out of spec and you might be better off replacing it. Some tubes are bent or not perfectly round from the stamping process when they\'re manufactured, even factory valves fit extremely tight when the tube is too far out of spec.
LUBRICATION : Variable-pump models should be assembled with oil to lube all the seals and moving parts. Add a drop of oil directly into the pump chamber every couple hundred shots. You can do this more often if the piston isn\'t working smooth or produces inconsistent performance. If you accidentally over-oil you can fire the gun with the barrel pointed straight up, unloaded and safely away from you. In that position excess oil settles near the valve stem and blows out through the barrel. To prevent oil-lock, only use two pumps for each shot until excess oil is cleared from the pump chamber and valve. A drop of oil should be applied to all pivot points of the pump lever and one at the back of the piston seal. This will lubricate the contact points of the piston.